

Tanat Valley 3 by Peter Drost
I started building wagons over 30 years ago in 4mm scale, before moving up to 7mm about 20 years ago. My first efforts were pretty dreadful (probably still are) but I persisted and slowly improved with added detail and better finish.
Most of my wagons are made from plastic sheet and I heavily use Evergreen milled plastic section. Details like nuts, bolts, and washers are what this article is all about.
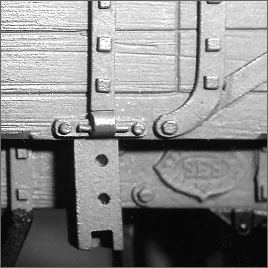 I do not know who first started to use small cubes of thin plastic cut from Slater’s strip to make square nuts, but it now appears to be universally accepted as the normal practice for making square headed nuts. I too use this method, like everyone else cutting nuts by the score before picking them up on then point of a scalpel and floating them on with a brush charged with liquid solvent. The size of the nuts varies so much with some wagons—early LNWR ones had quite large nuts, particularly on the end stanchions. Good drawings and photographs are essential.
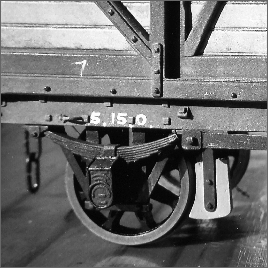 I like to cut the nuts on the reverse side of a dark green cutting mat, where it is easier to see the white nuts and hope to keep the same level of consistency. No attempt was made to portray any protruding screw through the middle of the nuts. Looking at the pictures will reveal if I have achieved my aim.
But what about wagons with hexagonal nuts? Well, a couple of years ago, I was going through the Squires tool catalogue when I came across a punch and die set to make hexagonal pressings from thin plastic card. I believe this was originally made for military modellers for making medals and buttons on uniforms. This was still available and was on page 68 in the 2004 catalogue priced at £39.99. The tool is made from a mild steel base but with a plastic top and four punches made from modified Allen keys. The tool worked quite well and at first I was able to produce some nice crisp hexagonal nuts, but over time the plastic top became worn and the crispness began to disappear, especially on the smaller size keys.
Grinding the bottom of the key restored some crispness back, but a top plate made from metal would have been preferable. I am sure some people will think that £39.99 is a lot to pay for a few nuts on the side of a simple wagon, but it is only the price of one etched wagon kit.
Also available is another punch and die set to make round discs at the lower price of £29.99. Thinking this might come in useful for making washers and any number of small circles, this too found its way into my workshop. Now I am sure most modellers will say that a washer in 7mm scale works out at the thickness of ultra thin tissue paper, that is impossible to make to scale, but it is the visual effect that I am after.
So now we have square nuts, hexagonal nuts, washers, but what about domed headed coach bolts that are used on steel under framed wagons. I am sure that somewhere in the dim and distance past I had read something about making them from Slater’s brown plastic rod, along with a photograph showing some examples. But where? I then spent a pleasant evening going back over many years of Model Railway Journal until I came to No 70 in 1994, page 114. There was a letter from a Fraser Brown (is this our very own Fraser Brown?) explaining how to make perfect domed bolt heads.
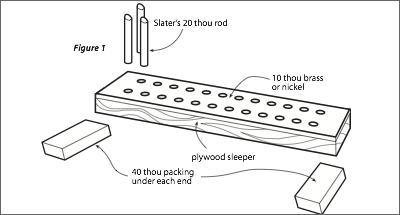
So out with the plastic rod and give it a go. And hey presto! coach bolts. But how to keep some form of consistency so that all appear the same size when placed on a wagon side. Some form of jig was obviously required. A start was made by trying to drill a piece of aluminium about a quarter of an inch thick with a 0.6mm drill to take Slater’s 20 thou rod. After breaking a few drills, I had a rethink and used instead a piece of nickel sheet this time only 10 thou thick, with a number of holes in line. This was then stuck to a plywood sleeper after removing any burrs (see illustrations below). The idea behind the jig was to place the plastic rod in the jig with a small amount protruding, and heat from a match used to melt a perfect domed head. If I packed the jig up and cut of the rod flush with the top, then removed the packing leaving the rod proud by 40 thou, then a line of bolts all the same size would hopefully result. I used a No 9 flat scalpel Swann-Morton blade to cut the rod flush with the top of the jig. This was a great success, so I made another jig along the same lines, but with smaller diameter holes to take Slater’s 10 thou rod. The drawings should make everything clear. With a bit of trial and error and adding or subtracting the packing under the jig, domed coach bolts of any size should be possible. Anyway, why stop at wagons? Buffer beams on locos spring to mind, when a riveting tool may distort the metal when we want large rivets. Obviously any plastic bolts will have to be glued in after all the soldering has been done, or your nice crisp bolts will be sliding down your buffer beam like lava from a volcano.

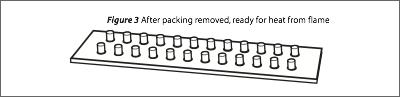

My little jig has 22 holes drilled in it and it takes only a couple of minutes to load with plastic rod and cut the rod off flush. Remove the packing and run a lighted match over the top without lingering too long is all that is needed. Turn the jig over and out fall 22 perfect domed headed coach bolts or rivets. I collect them in little clear jars with screw tops that were sold in Boots the Chemists for about 50p. I also collect the hexagonal nuts in these clear jars all marked with the size and thickness, as well as the colour, ie Black or White.
Top
Tanat Valley 3 by Peter Drost

John Borkowski converts Accurascale hopper wagons to S7

The Story of Reeth by Simon Caygill
For further information on the ScaleSeven Group, or if you have any questions: